

- To enable TPM and Secure Boot for a Windows 11 VM, the VMware Workstation wizard will include providing an “Encryption Information” page to set up the TPM feature. Also, to enable Secure Boot, you must complete this configuration from the virtual machine “Options” settings.
- It’s also possible to update an existing virtual machine to support TPM, Secure Boot, and UEFI, but you will have to make sure to update the VM storage type from MBR to GPT.
On VMware Workstation, if you want to create a virtual machine to run Windows 11, you must enable the Trusted Platform Module (TPM). Otherwise, you won’t be able to install the operating system. Secure Boot is highly recommended, but installing the operating system is not required.
A TPM is a chip that offers cryptographic functions, such as generating and storing encryption keys to enable features like Windows Hello, BitLocker, and others.
Secure Boot is a firmware technology that protects the boot process so that malware (such as rootkits) cannot attack the trusted operating system during startup.
Since we are dealing with virtualization, you are not required to have the hardware components physically on the device, meaning that you can run a Windows 11 virtual machine even on a Windows 10 computer without TPM, Secure Boot, or UEFI (Unified Extensible Firmware Interface).
In this guide, I will explain the steps to enable TPM and Secure Boot on VMware to install Windows 11 on a virtual machine. These instructions apply to Windows 11 and 10 and other supported platforms.
Create Windows 11 VM on VMware with TPM and Secure Boot support
To create a virtual machine with support for TPM and Secure Boot, use these steps:
Open VMware Workstation.
Click the File menu and select the “New virtual machine” option.
Click the Next button.
Select the latest virtual machine hardware compatibility option.
Click the Next button.
Select the “I will install the operating system later” option.

Click the Next button.
Select the Microsoft Windows option under the “Guest operating system” section.
Choose the Windows 11 x64 option under the “Version” section.
Click the Next button.
Confirm a name for the Windows 11 VM.
Confirm the location where the virtual machine will be stored.
Click the Next button.
Select the “Only the files needed to support TPM are encrypted” option.
Confirm the encryption password.
Check the “Remember the password on this machine in Credential Manager” option.
Click the Next button.
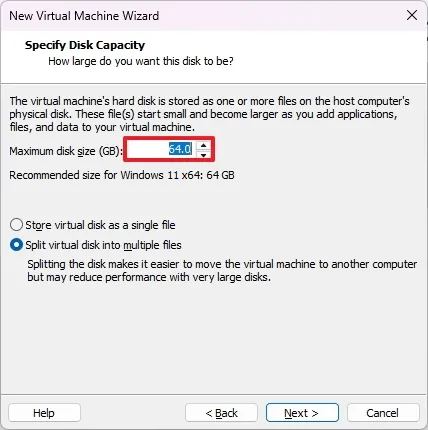
(Optional) Choose the “Split virtual disk into multiple files” option.
Specify the disk size in gigabytes (64GB or higher).
Click the Next button.
Click the Finish button.
(Optional) Right-click the virtual machine and choose the Settings option.
Select the Memory option and choose the desired amount of memory for the device (at least 8GB is recommended).
Choose the Processors option and select the number of cores for the device (at least four cores are recommended).

Click the Options tab.
Click on Advanced.
Check the “Enable secure boot” option under the “Firmware type” section.
Click the OK button.


After you complete the steps, you should be able to install Windows 11 on a virtual machine using VMware Workstation.
Enable TPM and Secure Boot on VM to install Windows 11
To enable TPM and Secure Boot on an existing VMware virtual machine, use these steps:
Open VMware Workstation.
Select the virtual machine.
Click the VM menu and select the Settings option.
Click the Options tab.
Select the Access Control option.
Select the Encrypt button under the “Encryption” section.
Select the “Only the files needed to support TPM are encrypted” option.
Create an encryption password.

Click the Encrypt button.
Click on Advanced.
Select the “UEFI” option and check the “Enable secure boot” option under the “Firmware type” section (if applicable).
Warning: Changing the firmware type may cause problems because you would have to update the drive partition from MBR to GPT before the system can boot in the new firmware type. If you don’t already have the VM with UEFI, I would highly recommend creating a new virtual machine.Click the Hardware tab.
Click the Add button.
Select the “Trusted Platform Module” option to run Windows 11.
Click the Finish button.
Click the OK button.


Once you complete the steps, the computer should include the required security components to pass the requirements check to upgrade to Windows 11.
Why You Can Trust Pureinfotech
The author combines expert insights with user-centric guidance, rigorously researching and testing to ensure you receive trustworthy, easy-to-follow tech guides. Review the publishing process.