


On Windows 10, Credential Manager is the feature that stores your sign-in information for websites (using Microsoft Edge), apps, and networks (such as mapped drives or shared folders) when you check the option to save your credentials for future logins.
The Credential Manager feature isn’t new—it has been around for a long time. It allows you to securely store and manage your login credentials so you don’t have to constantly remember and re-enter your usernames and passwords. Usually, the system will automatically save your credentials when you check the option to remember your login information, but from the manager app, you can always view, delete, add, backup, and restore credentials.
When you visit a website or app for which you’ve saved credentials, Credential Manager automatically fills in your login information, saving you time and effort. Also, the feature encrypts your information using strong encryption algorithms, making it difficult to access it unauthorizedly.
In this guide, I will teach you how to use the Credential Manager on Windows 10 to control all your login information.
View sign-in passwords on Credential Manager
To view passwords through the Credential Manager, use these steps:
Open Control Panel on Windows 10.
Click on User Accounts.
Click on Credential Manager.
Click the Web Credentials tab.
Click on the login information.
Click the Show option.

Confirm your authentication.
Confirm the password for the credential.

After you complete the steps, the Credential Manager will reveal the password for the web login.
It’s important to note that you can only view passwords for web credentials. The manager doesn’t provide an option to view Windows passwords.
Edit sign-in information on Credential Manager
To update a password or username already stored on Windows 10, use these steps:
Open Control Panel.
Click on User Accounts.
Click on Credential Manager.
Click the Windows Credentials tab (or Web Credentials).
Select the account.
Click the Edit button.

Update the username and password as necessary.
Click the Save button.


Once you complete the steps, the information will update with the new credentials, which means no more login prompts if you initially saved the wrong credentials or changed the sign-in information.
Delete sign-in information on Credential Manager
To delete an account credentials already stored on Windows 10, use these steps:
Open Control Panel.
Click on User Accounts.
Click on Credential Manager.
Click the Windows Credentials tab (or Web Credentials).
Select the account.
Click the Remove button.
Click the Yes button.

After you complete the steps, the account credentials will no longer be available on the computer, meaning that future logins will require you to enter a username and password manually.
Add new sign-in information on Credential Manager
To add an app or network credential on Windows 10, use these steps:
Open Control Panel.
Click on User Accounts.
Click on Credential Manager.
Click the Windows Credentials tab.
Click the “Add a Windows credential” (or “Add a certificate-based credential”) option.
Specify the internet or network address corresponding to the app or network resource.
Specify the username and password to authenticate.
Click the OK button.
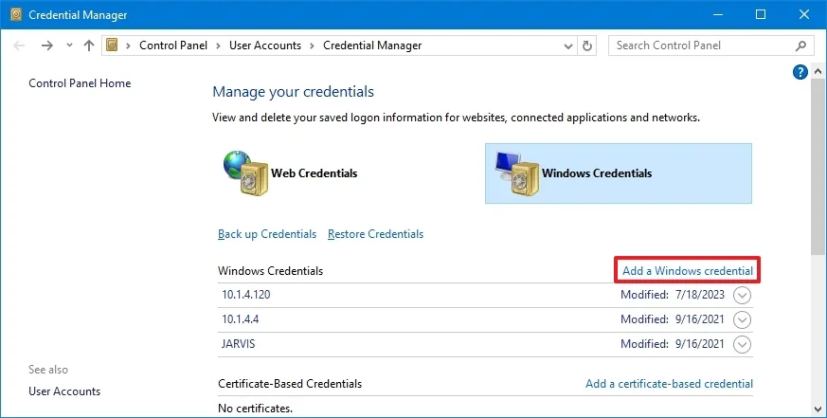

Once you complete the steps, the new account information will be added to the computer to sign in automatically the next time you access the apps or network shared.
If the website or network location requires a certificate for authentication, you can choose the “Add a Certificate-Based Credential” option. On this page, you will be able to specify the address and load the required certificate.
In addition, Credential Manager also includes the option to save generic credentials through the “Windows Credentials” page. This a convenient way to store login information for various types of accounts and services that don’t fit into the standard “Web Credentials” or “Windows Credentials” categories.
Backup sign-in information on Credential Manager
To export and backup all your credentials for apps and networks, use these steps:
Open Control Panel.
Click on User Accounts.
Click on Credential Manager.
Click the Windows Credentials tab.
Click the Back up Credentials option.
Click the Browse button to specify a destination for the backup.

Specify a name for the .crd backup file.
Click the Save button.
Click the Next button.
Use the “Ctrl + Alt + Delete” keyboard shortcut to continue.
Specify a password to protect the Credential Manager file on Windows 10.

Click the Next button.
Click the Finish button.


After you complete the steps, you’ll end up with a “.crd” file containing all your Windows 10 and web credentials you can import to another computer or the same device after a clean installation.
The Credential Manager features only allow backing up the “Windows Credentials.” You cannot export the web credentials through this process. However, you can always use the password manager built into Microsoft Edge.
Restore sign-in information on Credential Manager
To restore your sign-in information from backup on Windows 10, use these steps:
Open Control Panel.
Click on User Accounts.
Click on Credential Manager.
Click the Windows Credentials tab.
Click the Restore Credentials option.
Click the Browse button.
Select the “.crd” files with the backup information.
Click the Open button.
Click the Next button.
Use the “Ctrl + Alt + Delete” keyboard shortcut to continue.
Confirm the password to unlock the Credential Manager backup.
Click the Next button.
Click the Finish button.


Once you complete the step, your device’s credentials for sites, apps, and networks will be restored.
While this guide focuses on Windows 10, Credential Manager has been available for a long time, which means the steps will also work on Windows 8.1 and Windows 7.
Update September 18, 2024: This guide has been updated to ensure accuracy and reflect changes to the process.