- In Outlook, rules allow you to automatically perform actions on incoming or outgoing emails based on certain conditions.
- To create an Outlook rule, open Settings > Mail > Rules, click on “Add new rule,” configure the conditions and actions, and save.
- You can also right-click an email, choose “Rules,” and select the “Create rule” option.
- These instructions apply to the new Outlook app for Windows 11, 10, and the web version of the service.
You can create rules for emails in the Outlook app for Windows 11 (and 10) and on the web version of the service, and in this guide, I will explain how to complete this process.
Outlook rules are automated actions you can set up to efficiently manage your incoming and outgoing emails. This feature allows you to apply rules to specific messages based on various conditions, such as the sender, subject, or keywords in the message body.
For example, you can create a rule to automatically move messages from specific senders or those containing certain keywords to designated folders. You can also flag important messages for follow-up or highlight them for easy identification. You can delete messages that meet specific criteria, such as spam or junk mail, or forward messages to another email address or a specific folder.
In this guide, I’ll outline the steps to get you started creating rules in the new Outlook app for Windows 11 and 10, but the instructions will also work for the web version of the email service.
Create email rules in Outlook for Windows 11
In the email client app, you can create rules from the settings page or using an existing email. These are the same rules. The only difference is that if you start the rule from an email, the app will apply some default settings automatically.
From settings
To create new rules from the Outlook settings, use these steps:
Open the Outlook app on Windows 11.
Click on Settings (gear button from top-right).
Click on Mail.
Click the Rules tab.
Click the “Add new rule” button.

Confirm a descriptive name for the rule.
Select the condition for the rule.
Quick note: The list of rules is extensive, but they are self-explanatory. The condition can include specific emails, names, subjects, keywords, marks, size, and more. Also, you can add more than one condition with the “Add another condition” option.
Configure the condition according to the selected setting. For example, if you selected the “From” option, then confirm the email address for the rule.

Select the action for the rule.
Quick note: You can choose to move, copy, delete, pin mark message, and forward or redirect. Also, you can add more than one action with the “Add another action” option.
Configure the action according to the selected setting. For instance, if you chose the “Move to” option, then select the destination folder.

Check the “Stop processing more rules” option.
(Optional) Check the “Run rule now” option.
Click the Save button.
Choose the email account to apply the rule (if applicable).
(Optional) Turn off the toggle switch to disable the rule.
(Optional) Click the up or down button in the rule to change the process order.
Quick tip: The rules are processed from top to bottom, and when a match is found, the rule will execute. As a result, it’s always important to prioritize your rules so they work correctly.
(Optional) Open the “More actions” menu and choose the Edit rule option to make changes.
(Optional) Open the “More actions” menu and choose the Delete option to make changes.

After you complete the steps, the rule will apply and process every time a new email arrives in your inbox.
From email
To create a quick rule for Outlook from an email, use these steps:
Open the Outlook app.
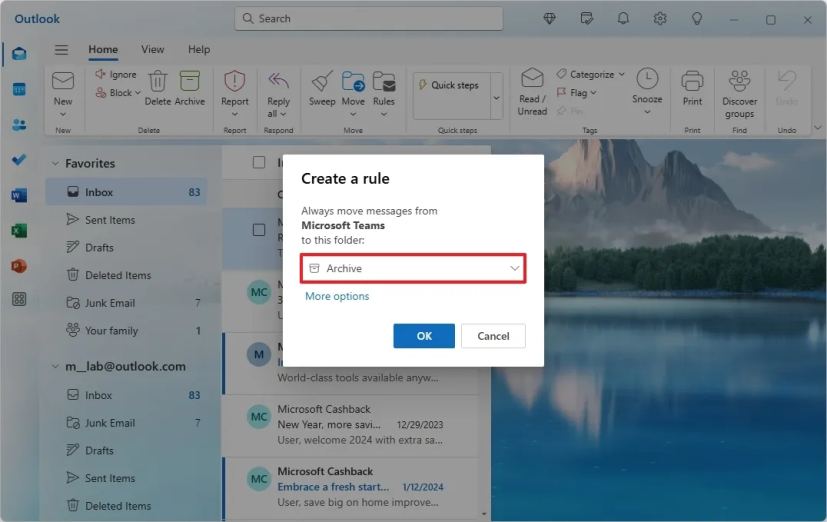
Right-click the email, select Rules, and choose the Create rule option.

(Option 1) Select the folder to move this and future email and click the OK button.

(Option 2) Click on More options.
(Optional) Change the name of the rule.
(Optional) Create a new condition or continue with the default configuration.
Select the action for the rule.

Quick note: You can choose to move, copy, delete, pin mark message, and forward or redirect.
Check the “Stop processing more rules” option.
Click the Save button.
(Optional) Turn off the toggle switch to disable the rule.
(Optional) Click the up or down button in the rule to change the process order.
(Optional) Open the “More actions” menu and choose the Edit rule option to make changes.
(Optional) Open the “More actions” menu and choose the Delete option to make changes.
Once you complete the steps, future emails will be analyzed and processed by the rules to perform specific actions.
When you enable the “Stop processing more rules” option for a specific rule, Outlook will stop checking other rules after applying that rule, even if the email meets the criteria for multiple rules.
This option prevents unintended actions. For example, if you have multiple rules that could apply to the same email, the “Stop processing more rules” option can prevent unwanted actions like deleting important emails or moving them to the wrong folder.
Also, you can prioritize specific rules by placing them higher in the rule list and checking the option to ensure that these rules are always applied first, regardless of other rules that might also apply.


